How to Successfully Migrate a Hyperscale Data Ingestion System
Introduction
Migrating a data ingestion system that handles petabytes of social graph data daily is no small feat. At Meta, we transitioned from a legacy customer-owned pipeline architecture to a more efficient self-managed warehouse service. This guide breaks down the step-by-step approach we took—from assessing the old system to fully deprecating it—so you can apply similar strategies to your own large-scale migration. Follow these steps to ensure data integrity, minimize latency, and maintain operational reliability throughout the process.

What You Need
- A legacy data ingestion system (e.g., customer-owned pipelines)
- A target new system architecture (e.g., managed warehouse service)
- MySQL or equivalent database deployment (the source of your data)
- A data warehouse (e.g., Hive, Iceberg) for the new system
- Monitoring and alerting tools for latency, resource usage, and data quality
- Verification scripts to compare row counts and checksums between old and new systems
- Automated rollback mechanisms
- A migration lifecycle tracking system (e.g., job manager or custom database)
- An engineering team with DevOps and data engineering expertise
Step-by-Step Migration Guide
Step 1: Assess Your Legacy System and Identify Instability Points
Before any migration, conduct a thorough audit of your current data ingestion system. Document its architecture, data flow, job dependencies, and known failure modes. At Meta, we observed that as our operations grew, the legacy customer-owned pipelines showed instability under increasingly strict data landing time requirements. Identify which jobs are most critical and which are prime candidates for early migration. This assessment will guide your planning and help you prioritize tasks.
Step 2: Design the New System Architecture
Your new system should address the shortcomings of the legacy one. For Meta, the new architecture moved away from customer-owned pipelines to a simpler, self-managed data warehouse service that operates efficiently at hyperscale. Ensure your design supports scalability, fault tolerance, and automated recovery. Define how data will be ingested, transformed, and landed in the warehouse. Consider using a managed service if your organization has the resources, or build a custom solution that separates ingestion from downstream consumers.
Step 3: Establish a Clear Migration Job Lifecycle
Create a formal lifecycle for each job being migrated. This lifecycle should define stages such as Shadow Run (both old and new systems run in parallel), Validation, Cutover, and Deprecation. At Meta, we used a lifecycle that required each job to meet strict success criteria before moving to the next stage. Document the expected duration and responsible team for each phase. This provides a clear roadmap and prevents premature finalization.
Step 4: Implement Verification Criteria for Each Migration Phase
For every job, define measurable success criteria that must pass before proceeding. Meta used three primary checks:
- No data quality issues: Compare both the row count and checksum of the data delivered by the old and new systems. Any discrepancy means the migration for that job must be halted and investigated.
- No landing latency regression: The new system should deliver data at least as fast as the old system. Monitor latency metrics and ensure there is no regression.
- No resource utilization regression: Ensure the new system does not consume more CPU, memory, or I/O than the legacy system for the same workload.
Automate these checks where possible to reduce manual effort and speed up validation.
Step 5: Set Up Robust Rollout and Rollback Controls
Your migration plan must include both rollout and rollback procedures. Rollout should be gradual—start with a small set of non-critical jobs. For each job, have a documented method to revert to the legacy system within minutes if issues arise. At Meta, we baked rollback capabilities into the migration lifecycle so that any job failing verification could be immediately rolled back without affecting other jobs. Use feature flags or configuration switches to toggle between systems seamlessly.
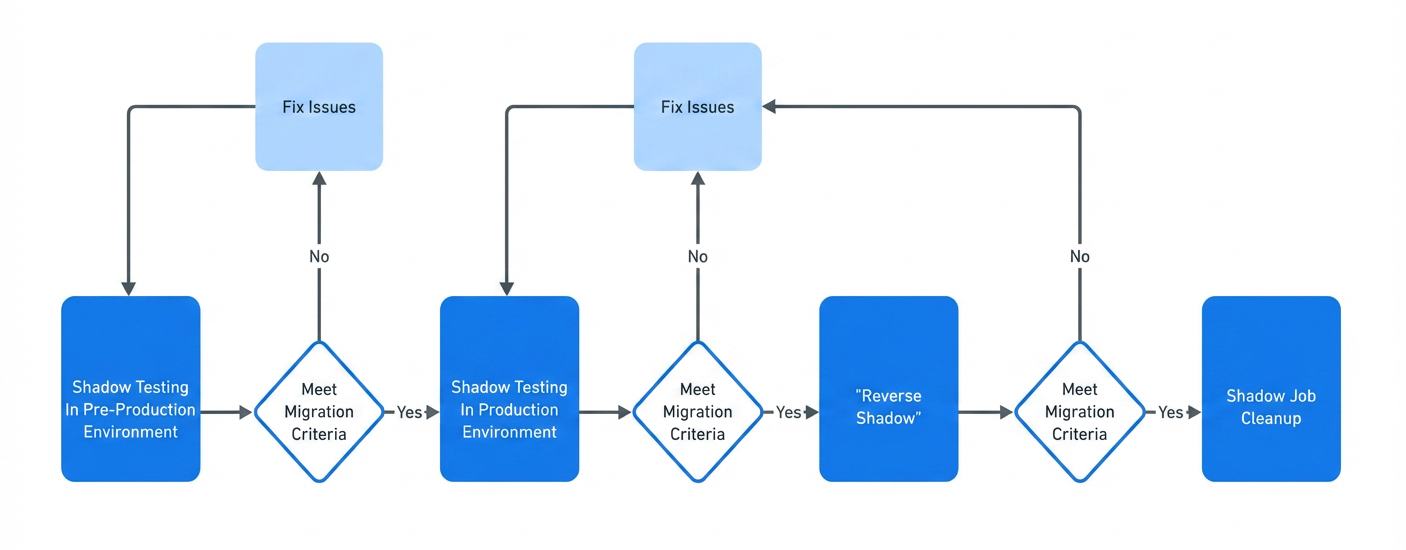
Step 6: Execute Phased Migration with Parallel Runs
Begin by running the new system in parallel with the old system for a small subset of jobs (shadow mode). Monitor both outputs closely. Once you're confident, migrate incrementally: move 10%, then 25%, then 50% of jobs, etc. Each phase should include thorough validation against the criteria from Step 4. Increase the scope only after all jobs in the current phase have passed verification and have been stable for at least one full data cycle (e.g., 24 hours).
Step 7: Monitor and Validate During Migration
Set up real-time dashboards for key metrics: data landing latency, row counts, checksum comparisons, and resource usage. Alert your team immediately if any metric deviates from expected ranges. At Meta, we also monitored downstream consumer feedback—ensuring that reports, ML models, and other data products received consistent data. Regular validation checkpoints (e.g., hourly or daily) help catch issues early before they escalate.
Step 8: Deprecate Legacy System After Full Validation
Only after all jobs have been migrated and have remained stable for an extended period (e.g., one week) should you begin deprecating the legacy system. Turn off old pipelines gradually, verifying that each shutdown does not impact data availability. Finally, remove the legacy infrastructure and update all documentation. Meta successfully transitioned 100% of the workload and fully deprecated the old system.
Tips for a Successful Migration
- Start with non-critical jobs: Migrate less important data streams first to build confidence in your process.
- Automate verification: Use scripts to compare row counts and checksums automatically—manual checks are too slow at scale.
- Maintain a fallback option: Keep the legacy system running in read-only or shadow mode until you are absolutely sure the new system is stable.
- Communicate with stakeholders: Keep downstream data consumers informed about migration timelines and potential impacts.
- Document everything: Record each job’s lifecycle, verification results, and any issues encountered. This helps with post-migration audits and future migrations.
- Plan for rollback: Design your system architecture so that rollback can be executed quickly without data loss.
- Test under load: Simulate peak traffic scenarios to ensure the new system handles the same volume as the legacy one.